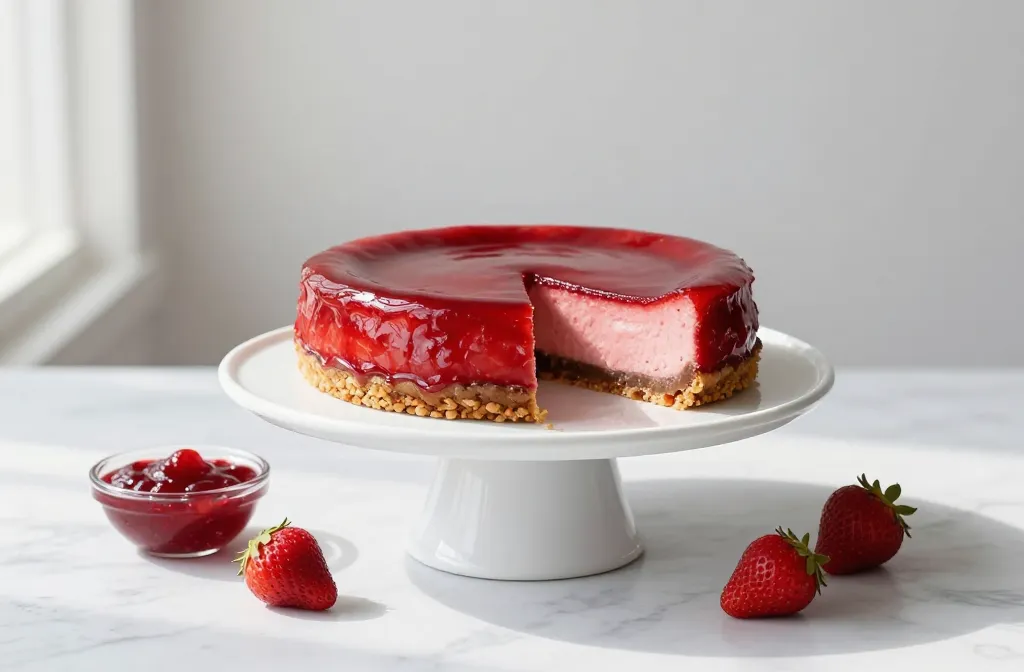
Strawberry cheesecake doesn’t need a big sales pitch. It’s creamy, it’s dreamy, and it steals the spotlight at any gathering. If you’ve ever wanted that bakery-level slice at home without a sugar-coated meltdown, you’re in the right place. Let’s make a cheesecake that sets clean, slices like a dream, and tastes like summer high-fived a cloud.
What Makes This Cheesecake So Good
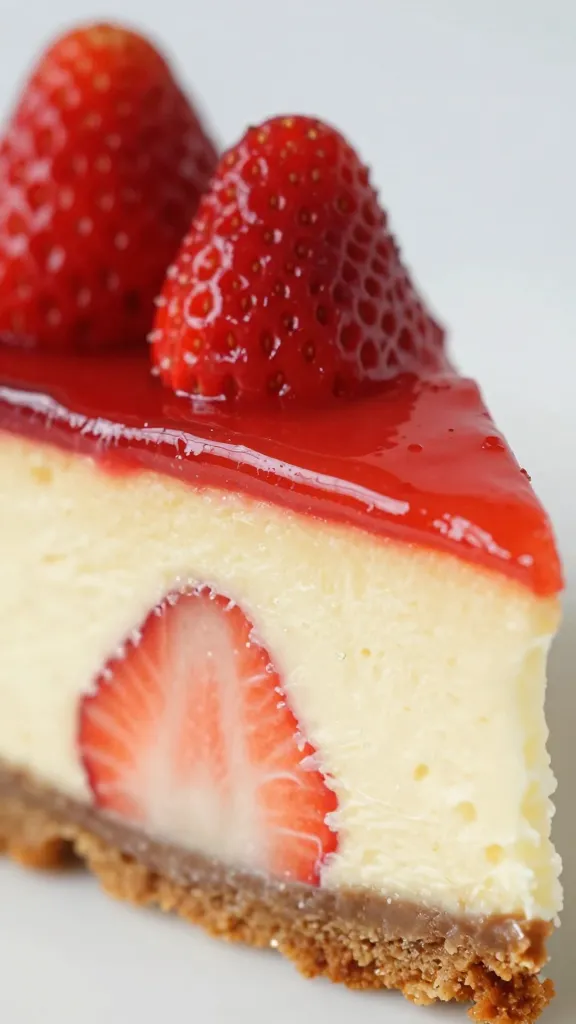
You get a buttery, crisp crust; a silky, tangy filling; and a glossy strawberry topping that looks like it belongs in a fancy display case. The balance matters: not too sweet, not too dense. We bake it low and slow for ultimate creaminess, then chill it properly so it firms up like a pro. Sound fussy? It isn’t—just follow the beats.
- Texture: Ultra-smooth, thanks to room-temp ingredients and gentle mixing.
- Flavor: Cream cheese tang + vanilla comfort + bright berries.
- Look: Clean edges, no cracks, a ruby-red finish. Iconic.
Ingredients You’ll Need
Yes, you can swap a few things. No, you can’t skip the chill time. Here’s the full lineup for a 9-inch springform pan.
Crust
- 1 1/2 cups graham cracker crumbs (or digestive biscuits)
- 2 tbsp granulated sugar
- 1/4 tsp fine salt
- 6 tbsp unsalted butter, melted
Cheesecake Filling
- 32 oz (900 g) full-fat cream cheese, room temperature
- 1 cup granulated sugar
- 1/4 cup sour cream, room temperature
- 1/4 cup heavy cream, room temperature
- 1 tbsp fresh lemon juice
- 2 tsp vanilla extract
- 4 large eggs, room temperature
- 1/4 tsp fine salt
Strawberry Topping
- 1 lb fresh strawberries, hulled and sliced (plus a few whole for flair)
- 1/2 cup granulated sugar
- 2 tbsp lemon juice
- 1 tbsp cornstarch mixed with 1 tbsp water (slurry)
- 1 tsp vanilla extract
- Pinch of salt
Tools That Make Life Easier
You don’t need a culinary degree—just a few basics that help you avoid chaos.
- 9-inch springform pan: The sides release easily for clean slices.
- Stand mixer or hand mixer: Low speed = fewer air bubbles.
- Heavy-duty foil: To wrap the pan for the water bath.
- Roasting pan: For the water bath (aka the steamy spa).
- Offset spatula: For smoothing the top. Optional but satisfying.
Step-by-Step: From Crust to Crown
We’ll keep it simple but precise. Cheesecake rewards patience like nothing else. IMO, it’s the chill time that separates okay from “who made this and can I marry them.”
1) Make the Crust
- Heat oven to 350°F (175°C).
- Mix crumbs, sugar, and salt. Stir in melted butter until it feels like damp sand.
- Press into the bottom of the springform pan and slightly up the sides.
- Bake 10 minutes. Cool while you prep the filling. Drop oven to 325°F (160°C).
2) Mix the Filling (Low and Slow)
- Beat cream cheese on low until smooth and lump-free, about 2 minutes. Scrape the bowl often.
- Add sugar and salt. Mix on low until glossy.
- Blend in sour cream, heavy cream, lemon juice, and vanilla.
- Add eggs one at a time, mixing on low just until combined. Do not overmix.
3) Set Up the Water Bath
- Wrap the outside of the springform pan with 2-3 layers of heavy foil to keep water out.
- Pour filling onto the cooled crust. Smooth the top.
- Place the pan inside a large roasting pan. Pour hot water into the roasting pan halfway up the sides of the springform.
4) Bake
- Bake at 325°F (160°C) for 60–75 minutes. The edges should look set; the center should jiggle like Jell-O, not like waves during a storm.
- Turn off the oven. Crack the door. Let it sit inside for 45 minutes. This prevents cracks. FYI, impatience equals fissures.
- Remove from the oven and water bath. Cool on a rack until room temp, about 1–2 hours.
5) Chill Properly
- Cover and chill at least 6 hours, preferably overnight. You’ll get clean slices and perfect texture.
6) Make the Strawberry Topping
- Combine half the strawberries with sugar, lemon juice, and salt in a saucepan. Cook over medium until juicy, about 5–7 minutes.
- Stir in the cornstarch slurry. Simmer until glossy and thick, 1–2 minutes.
- Remove from heat. Stir in vanilla. Fold in remaining fresh strawberries for a mix of jammy and bright.
- Cool to room temp before topping the cheesecake.
Assembly, Slicing, and Serving Like a Pro
This is the fun part. It’s also where people rush and ruin the edges. We won’t do that.
- Run a thin knife around the chilled cheesecake edge before releasing the springform. Non-negotiable.
- Spoon the cooled strawberry topping over the top, leaving a slight border for drama.
- For clean slices, use a hot knife: dip in hot water, wipe, slice, repeat. Yes, every time. Yes, it’s worth it.
- Garnish with whole berries or a little lemon zest if you feel fancy.
Smart Swaps and Flavor Twists
Want to change it up? I support your creative chaos—as long as you keep the method solid.
Crust Alternatives
- Chocolate cookie crust: For a chocolate-covered strawberry vibe.
- Biscoff cookies: Add spiced caramel notes that make people ask for the recipe.
- Gluten-free: Use GF graham crackers or almond flour (add 1–2 tbsp extra butter).
Filling Boosters
- Lemon zest: 1 tsp for extra brightness.
- Vanilla bean paste: Swap for extract if you want those pretty specks.
- Greek yogurt: Sub for sour cream 1:1—slightly lighter, still creamy.
Topping Variations
- Roasted strawberries: Toss with sugar and roast at 375°F until jammy. Deeper flavor, IMO.
- Mixed berries: Strawberries + raspberries + blueberries = color pop.
- No-cook macerated berries: Toss sliced berries with sugar and lemon, let sit 20 minutes, spoon on top. Fresher, quicker.
Troubleshooting: Avoid the Common Pitfalls
You don’t need drama—just solutions. Here’s how to keep things smooth.
- Cracks: Usually from overbaking or skipping the cool-down. Keep the jiggle, then crack the oven door.
- Leaky water bath: Double-wrap with foil or use a silicone pan sleeve. Or place the springform inside a larger cake pan, then into the water bath.
- Lumpy filling: Your ingredients weren’t room temp. Let everything sit out for 1–2 hours next time.
- Soggy crust: Prebake the crust and cool it fully; foil-wrap tightly; don’t flood the bath.
FAQ
Can I make this ahead?
Absolutely. Cheesecake loves a chill. Make it up to 2 days in advance, keep it covered in the fridge, and add the strawberry topping the day you serve for the best texture and color.
Do I really need a water bath?
If you want a silky, crack-free cheesecake, yes. The steam keeps the custard gentle and even. If you skip it, lower the oven temp and watch it closely—but be prepared for a few cracks.
How do I freeze strawberry cheesecake?
Chill the baked cheesecake overnight, then freeze it (without topping) until firm. Wrap tightly in plastic and foil. Freeze up to 2 months. Thaw overnight in the fridge and add the topping fresh. FYI, it tastes shockingly good after freezing.
Can I use frozen strawberries?
For the topping, definitely. Simmer them a bit longer to cook off extra moisture, and taste for sweetness. For garnish, use fresh if you can—frozen won’t look as sharp.
What if I don’t have a springform pan?
Use a deep 9-inch cake pan lined with a parchment sling. After chilling, warm the sides with a towel and lift it out. It’s a little fiddly, but it works in a pinch.
How do I know when it’s done?
Check at 60 minutes. The edges should look set, and the center should jiggle like a soft-set pudding. If it sloshes, give it another 5–10 minutes and recheck. Don’t wait for a firm center—that happens in the fridge.
Conclusion
Strawberry cheesecake wins hearts because it nails the trio: creamy filling, crisp crust, and bright berries. Keep the mixer on low, trust the jiggle, and chill it like you mean it. Do that, and you’ll slice into bakery-level bliss at home—no stress, no cracks, just pure dessert glory. IMO, it’s the kind of recipe that turns “I don’t bake” into “When are you free Saturday?”