You know that moment when you take a bite of something and instantly think, “I should not be left alone with this”? That’s Oreo Rice Krispies. They’re familiar, messy-in-a-good-way, and dangerously easy. You’ll crush cookies, melt butter, and suddenly become everyone’s favorite person at the potluck. Ready to stir up a storm with a spoon?
Why Oreo Rice Krispies Just Work
You’re taking a beloved classic and smashing it together with the world’s most dunkable cookie. That combo just hits. The crispy-chewy base gives you texture, while Oreos bring crunch, creaminess, and chocolatey swagger.
Bonus: No oven. Minimal cleanup. Maximum payoff. If you can melt butter, you can make these. And if you can’t melt butter, we need to talk.
The Base Formula (So You Don’t Overthink It)
Let’s keep it simple. You’ll follow the same general ratios as classic marshmallow treats, then upgrade them with Oreos.
Essential ingredients:
- 6 cups Rice Krispies (or any crispy rice cereal)
- 10 cups mini marshmallows (about 16 oz)
- 6 tablespoons unsalted butter
- 16–20 Oreo cookies, crushed
- 1 teaspoon vanilla extract (optional but delicious)
- Pinch of salt (do it)
Quick steps:
- Melt butter in a large pot over low heat.
- Add 8 cups marshmallows and stir until smooth. Remove from heat.
- Stir in vanilla and salt.
- Fold in cereal and crushed Oreos.
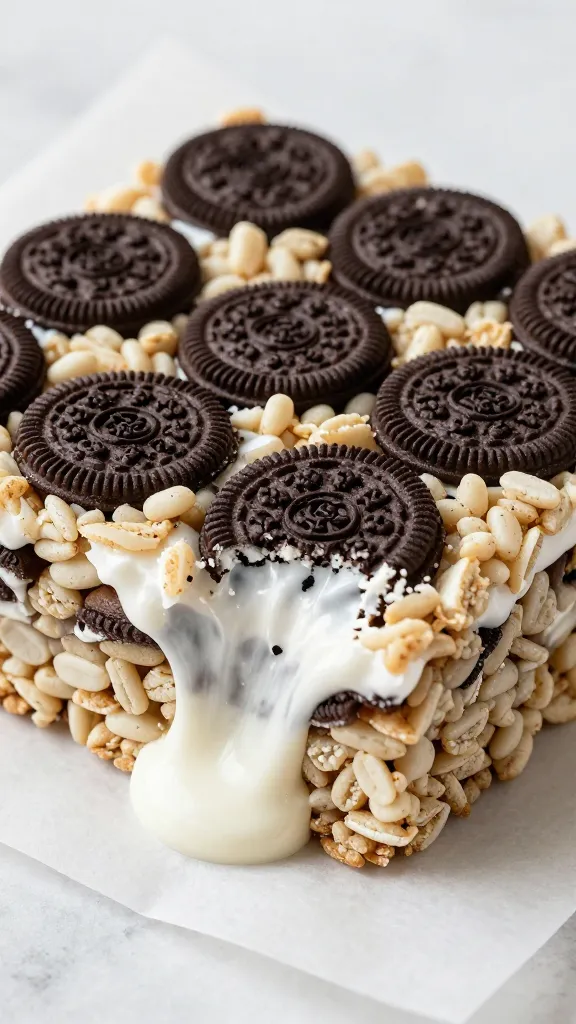
- Fold in remaining 2 cups marshmallows for extra gooey pockets.
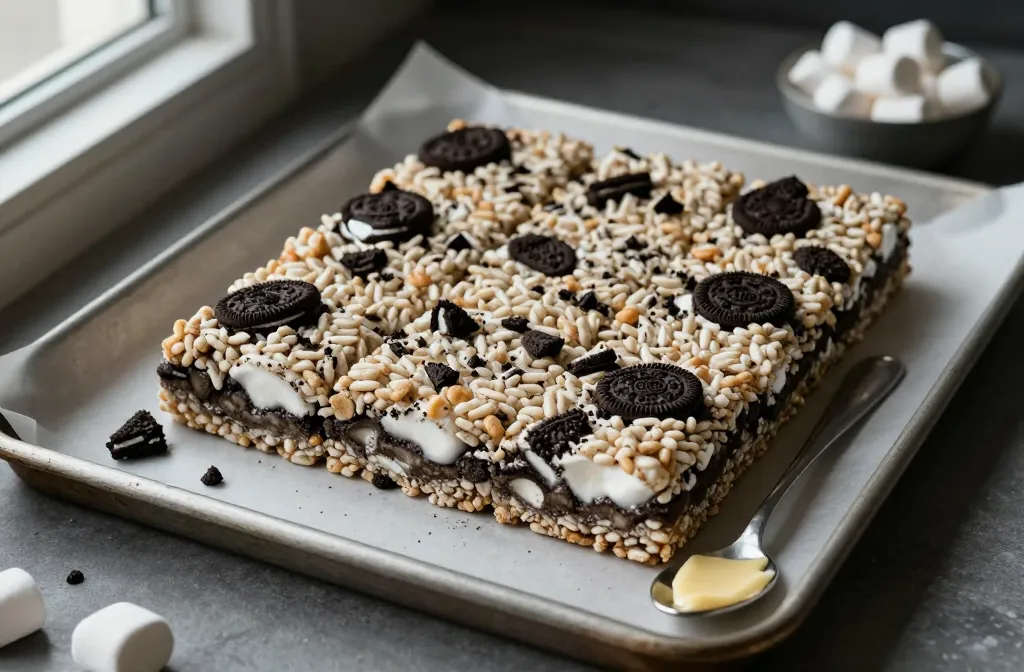
- Press into a greased 9×13 pan. Don’t pack it too hard.
- Cool 30–45 minutes. Slice. Try not to eat the whole pan.
Crushing the Oreos (The Right Way)
You want texture, not dust. Toss the cookies in a zip-top bag and bang them with a rolling pin. Aim for a mix of chunky bits and sandy crumble. FYI: the cream filling melts into the marshmallow and tastes like victory.
Pro Tips for Supreme Gooeyness
You can make these good or you can make these mind-blowing. Let’s aim for mind-blowing.
- Low heat only: High heat scorches marshmallows and turns them weirdly stiff. Be patient.
- Reserve marshmallows: Folding in extra minis at the end gives you glorious goo pockets.
- Salt matters: Just a pinch cuts sweetness and makes the chocolate pop.
- Don’t overpack the pan: Light press = soft, chewy bars. Hulk smash = sad, dense slabs.
- Butter your spatula: Or spray with nonstick. Marshmallow fights dirty.
Make Them Bakery-Pretty
Want the Instagram moment? Drizzle melted white chocolate over the top, then sprinkle extra Oreo crumbs. You’ll look like you tried way harder than you did (IMO, the best kind of baking).
Flavor Upgrades You’ll Brag About
You can absolutely stop at the classic. Or you can go full mad scientist.
- Cookies & Cream Dream: Add 1/2 cup chopped white chocolate, plus more Oreo pieces on top.
- Mocha Crunch: Stir in 1 teaspoon espresso powder with the butter. Coffee + Oreo = elite.
- Salted Caramel Drizzle: Swirl in 1/3 cup store-bought caramel at the very end. Finish with flaky salt.
- Peanut Butter Twist: Melt 1/4 cup peanut butter with the butter for a nutty base.
- Birthday Cake Vibes: Use Golden Oreos and throw in sprinkles. Chaotic? Yes. Fun? Also yes.
Make Them Gluten-Free
Use certified gluten-free crispy rice cereal and swap in gluten-free chocolate sandwich cookies. Easy. No one will notice unless you brag about it (which you’re allowed to do).
Texture Control: Soft vs. Sturdy
Want soft and squishy? Or firm and lunchbox-proof? You’re in charge.
- Softer bars: Add an extra tablespoon of butter and reduce cereal to 5 1/2 cups.
- Firmer bars: Use the full 6 cups cereal and pack lightly. Chill 20 minutes before slicing.
- Extra crunch: Stir in a handful of extra Oreo chunks just before pressing into the pan.
Pan Size Matters
A 9×13 pan gives thinner squares. Prefer chunkier bars? Use a 9×9 pan and increase the cool time. Either way, line with parchment for cleaner slices and easier pan-to-mouth transfer.
Serving, Storing, and Not Eating Them All Immediately

These shine same-day, but they still slap on day two if you store them right.
- Room temp: Keep in an airtight container up to 3 days. Layer with parchment if you stack.
- Keep them soft: Add a slice of bread in the container to maintain moisture. Weird trick, works great.
- Freezer-friendly: Wrap bars individually and freeze up to 1 month. Thaw at room temp 30 minutes.
Perfect for Sharing (or Not)
Bring these to work and watch them disappear. Cut them into bites for parties, or go large and claim “portion control is a social construct.” Your call.
Common Mistakes (And Easy Fixes)
Let’s dodge the usual pitfalls so you don’t end up with sugary regret.
- Overheating marshmallows: If they look glossy and stretchy, you nailed it. If they look curdled or stiff, the heat ran too high.
- Using stale cereal: It tastes like cardboard. Open a fresh box. Seriously.
- Crushing Oreos too fine: You’ll lose the iconic crunch. Leave some big chunks.
- Packing the pan: Press just until even. Use parchment to gently smooth the top.
FAQs
Can I use jumbo marshmallows instead of mini?
Yes, but chop them up first so they melt evenly. Minis melt faster and give you better control, so I prefer them. If you only have jumbo, reduce the heat and stir patiently.
Do I need to remove the Oreo cream?
Nope. The cream melts into the marshmallow and adds flavor. Removing it just creates extra work and sad cookies. Keep it in for peak cookies-and-cream energy.
How do I prevent sticky hands when pressing the mixture?
Lightly butter your hands or use a sheet of parchment to press. You can also mist a spatula with nonstick spray. Press gently—don’t compact it like you’re paving a driveway.
What if my bars turned hard?
You likely overheated the marshmallows or packed the mixture too tightly. Next time, keep the heat low and press with a lighter touch. For now, microwave a square for 5–7 seconds to soften it up.
Can I cut these into shapes?
Yes. Let the pan cool for 15–20 minutes, then use greased cookie cutters. Press scraps back together for chef’s treats. IMO, hearts and stars earn maximum “awww” points.
Which Oreos work best?
Classic Oreos keep the balance right. Double Stuf works if you want extra creaminess, while flavored Oreos can be fun—try mint for a Thin Mint vibe or birthday cake for party mode. Avoid super-limited flavors that taste like scented candles. You know the ones.
Conclusion
Oreo Rice Krispies bring pure joy with almost no effort—my favorite combo. They’re crunchy, gooey, and just a little chaotic in the best way. Start with the base, riff with a flavor upgrade, and claim dessert hero status. And if a corner piece goes missing before serving? It’s called quality control, FYI.