Honey garlic chicken doesn’t ask for much—just a skillet, a few pantry staples, and like, 20 minutes of your attention. In return, you get juicy chicken glazed in a sticky-sweet, garlicky sauce that clings to every bite. No marinating overnight. No mysterious techniques. Just dinner that tastes like you tried way harder than you did.
Why Honey Garlic Chicken Wins on Busy Nights
You want bold flavor without complicated steps? This delivers. The sauce uses ingredients you probably have right now: honey, soy sauce, garlic, and a splash of acid. That combo makes chicken taste rich, glossy, and slightly caramelized—aka restaurant vibes at home.
Plus, the recipe scales up easily. Cooking for one? Cute. Cooking for four? Not a problem. You can double the sauce without breaking anything, except maybe your self-control.
The Core Ingredients (and Why They Work)
You only need a handful of items, but each one matters. Here’s the lineup and what each brings to the party.
- Chicken thighs or breasts: Thighs stay juicier and forgive overcooking. Breasts cook faster if you pound them to an even thickness.
- Honey: Adds sweetness and gives that glossy finish when it reduces. It also helps the sauce cling to the chicken.
- Soy sauce: Brings saltiness and umami. Use low-sodium if you like control.
- Garlic: Fresh garlic only. Minced fine. This is not a garlic powder moment.
- Acid: Rice vinegar or lemon juice balances the sweetness. Don’t skip it.
- Optional heat: Red pepper flakes or a dash of sriracha to cut the sweet.
- Butter: A tiny knob at the end for silkiness. Trust me.
- Cornstarch: Optional, for a thicker, stickier sauce.
Pantry Swaps That Still Work
– No soy sauce? Use tamari or coconut aminos (FYI: coconut aminos taste sweeter, so reduce the honey slightly).
– No rice vinegar? White wine vinegar or apple cider vinegar works. Lemon juice tastes fresh but a bit sharper.
– No honey? Maple syrup works, but expect a deeper flavor and slightly thinner glaze.
Step-by-Step: From Skillet to Table in 20 Minutes
This method gives you golden chicken and a sauce that coats it like a dream. You’re basically building layers of flavor quickly.
- Prep the chicken: Pat dry. Season with salt and pepper. If using breasts, pound to even thickness.
- Mix the sauce: Stir honey, soy sauce, minced garlic, vinegar, and a pinch of chili flakes in a bowl. Taste it. It should be sweet-savory with a little tang.
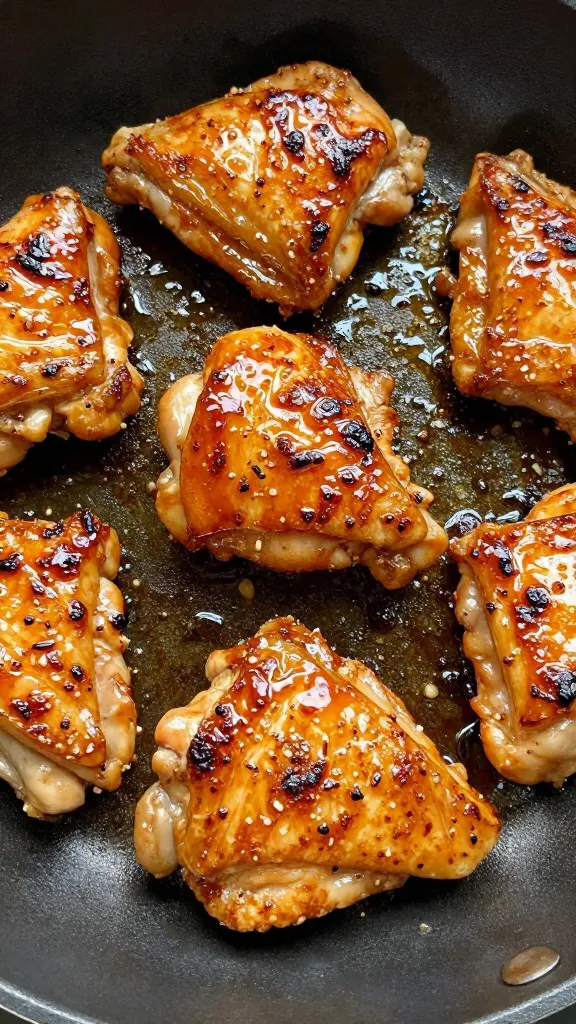
- Sear the chicken: Heat a splash of oil in a skillet over medium-high. Sear chicken 4-5 minutes per side (thighs may need a minute more). Get that golden crust.
- Deglaze and sauce: Lower heat to medium. Pour in the sauce. Scrape up brown bits. Simmer 2-4 minutes.
- Thicken (optional): Stir in a cornstarch slurry (1 tsp cornstarch + 1 tbsp water) and simmer 1 minute until glossy.
- Finish with butter: Swirl in 1 tbsp butter for shine and flavor. Turn the chicken to coat.
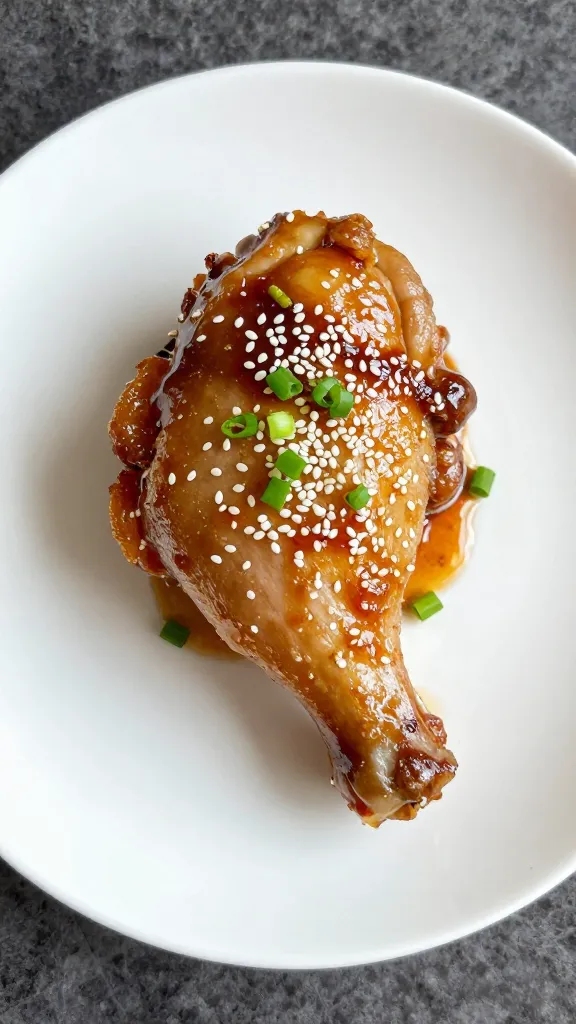
- Rest and slice: Rest a couple minutes. Slice and spoon extra sauce over the top.
Quick Doneness Cues
– Internal temp: 165°F for breasts, thighs can go to 170-175°F and still stay juicy.
– Visual: Juices run clear and the meat feels firm but springy.
– Sauce: Glossy, thick enough to coat a spoon, not syrup-cement.
Flavor Tweaks to Match Your Mood
You can steer this in a few directions depending on what you crave. IMSO (in my strong opinion), tiny changes = big payoff.
- Ginger zing: Add 1 tsp grated fresh ginger to the sauce for brightness and warmth.
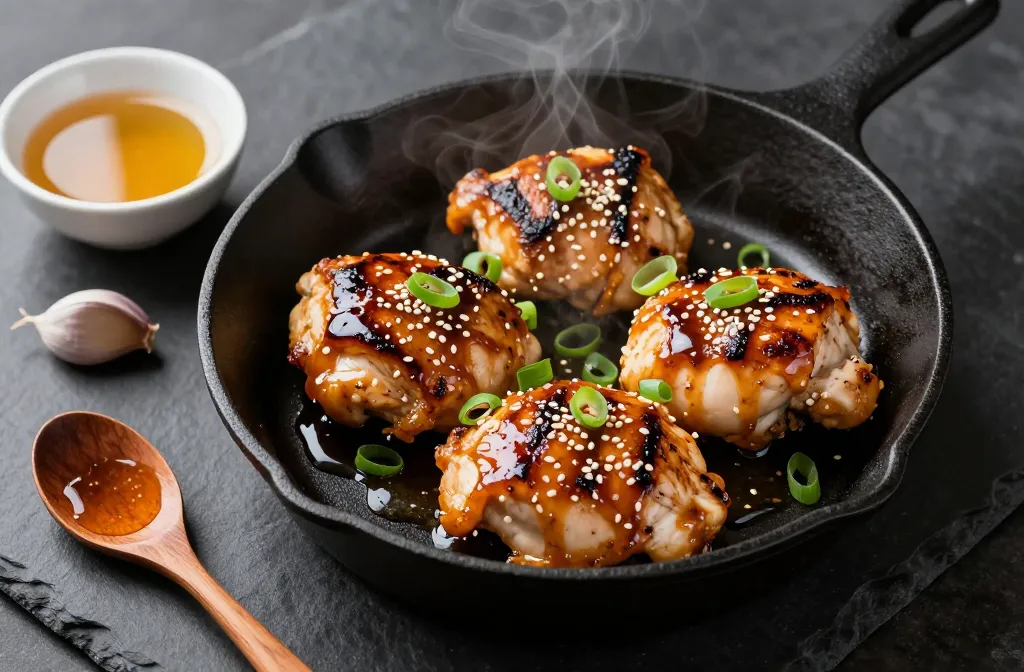
- Sesame vibes: Drizzle in 1 tsp toasted sesame oil at the end and sprinkle sesame seeds on top.
- Citrus pop: Swap vinegar for lemon juice and finish with lemon zest.
- Spicy-sweet: Add 1 tsp sriracha or gochujang to the sauce for a sticky kick.
- Herb uplift: Finish with chopped scallions or cilantro. Both make it feel fresher.
Make It Crispy (Without Deep Frying)
Coat chicken lightly in cornstarch before searing. You’ll get a delicate crust that grabs onto the sauce like Velcro. Bonus: the sauce thickens faster when it hits that starchy surface.
What to Serve with It
Keep the sides simple so the chicken can flex. The sauce doubles as a dressing for grains or veggies, so don’t waste a drop.
- Rice: Jasmine or basmati soaks up the sauce beautifully.
- Noodles: Toss cooked noodles in a bit of the sauce, then top with sliced chicken.
- Vegetables: Broccoli, snap peas, or green beans. Steam or sauté and toss with a spoon of sauce.
- Salad: Crunchy slaw with a light vinaigrette balances the sweetness.
- Potatoes: Roasted or mashed—untraditional but delicious, IMO.
Meal Prep and Make-Ahead Tips
You can absolutely prep this ahead without losing that fresh-cooked feel. Here’s how to keep it tasting great.
- Prep now, cook later: Mix the sauce and store for up to 3 days. Keep the chicken seasoned and ready.
- Cooked and stored: Refrigerate in an airtight container for 3-4 days. Keep extra sauce separate if you have it.
- Reheat without drying out: Warm gently in a skillet with a splash of water to loosen the sauce. Microwave in short bursts, covered.
- Freezer-friendly: Cooked chicken freezes up to 2 months. Thaw overnight in the fridge, then rewarm with a bit of fresh sauce.
Scaling Up for a Crowd
Use two pans or work in batches to avoid steaming the chicken. Crowded pans make sad, pale chicken. Give the pieces space, get that sear, then combine everything with the sauce at the end.
Common Mistakes (And How to Dodge Them)
We’ve all been there—burned garlic, watery sauce, chicken that tastes like regret. Here’s how to avoid the usual traps.
- Burning the garlic: Lower the heat before you add the sauce. If the pan smokes like a chimney, cool it for 30 seconds.
- Thin sauce: Simmer longer or add a tiny cornstarch slurry. Also, don’t dump in extra water “just because.”
- Overcooked chicken: Pound breasts evenly, and pull them at temp. Residual heat finishes the job.
- Too sweet: Add more acid or a little extra soy. Spice helps too.
- Not enough flavor: Taste the sauce before it hits the pan. Adjust salt, acid, and heat until it sings.
FAQs
Can I bake honey garlic chicken instead of pan-searing?
Yes. Sear first if you can for color, then bake at 400°F for 10-12 minutes (breasts) or 15-18 minutes (thighs), brushing with sauce. No time to sear? Bake directly and broil for 1-2 minutes at the end for caramelization.
Is this recipe gluten-free?
Use tamari or certified gluten-free soy sauce, and double-check your cornstarch and any chili sauces. Everything else typically plays nice. Taste-wise, you won’t miss a thing.
How do I keep the sauce from getting too dark?
Honey caramelizes fast. Keep the heat at medium once the sauce goes in, and stir. If it starts to darken too quickly, splash in a tablespoon of water and lower the heat. Crisis averted.
What protein swaps work with this sauce?
Shrimp, salmon, tofu, and pork chops all love honey garlic sauce. Adjust cook times: shrimp and tofu go quick; salmon needs gentle heat; pork likes a good sear plus a few extra minutes.
Can I reduce the sugar?
You can cut the honey by a third and still get a nice glaze. Balance with a touch more soy and a dash of vinegar. It won’t be as sticky, but it’ll still slap.
Should I marinate the chicken?
You don’t need to. The sauce coats and reduces while the chicken finishes cooking, which adds plenty of flavor. If you insist, quick-marinate for 15-30 minutes in a mix of soy, garlic, and a bit of oil (save the honey for cooking so it doesn’t burn).
Conclusion
Honey garlic chicken checks every box: fast, minimal cleanup, and huge flavor. You sear, you sauce, you swirl in butter, and suddenly dinner feels special—with almost no effort. Keep it flexible, taste as you go, and serve it with something that soaks up every drop. FYI: once you make it once, you’ll keep that sauce formula on speed dial, IMO.