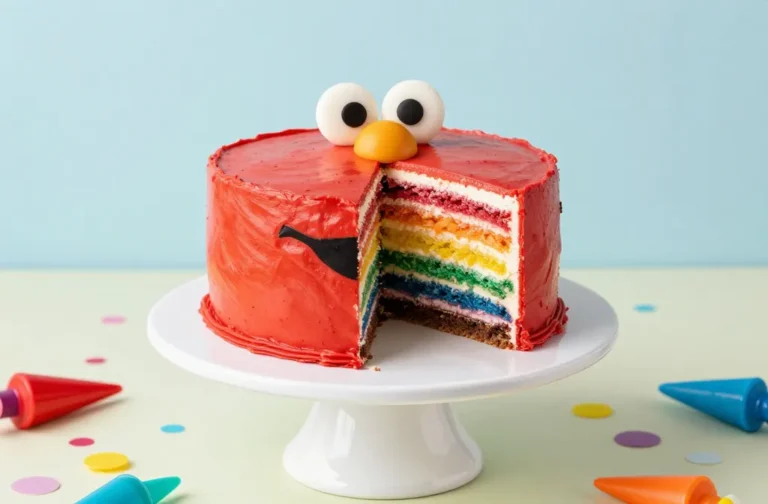
I promised my niece a Mickey Mouse cake, and then my mouth wrote a check my baking skills had to cash. I’m not a pro decorator—I’m a committed Googler with a decent whisk. So I mapped it out, made a mess, and somehow pulled off a cake that got literal gasps. Here’s the complete story—wins, mistakes, and all the buttercream.
The Game Plan: Sketch First, Panic Later
I started with a quick sketch: one big face, two ears, classic expression. Nothing fancy—just circles and vibes. I measured my cake pans to get the scale right and wrote a mini timeline so I didn’t frost warm cake like a rookie.
My plan, in plain English:
- Day 1: Bake cakes, cool completely, wrap, and chill.
- Day 2 morning: Make buttercream, cut the shapes, crumb-coat, chill.
- Day 2 afternoon: Final coat, add details, chill, admire.
Why a two-day plan?
Because cold cake doesn’t shed crumbs everywhere. Also, I value my sanity. Chilling gives you smooth edges and fewer tears—yours and the cake’s.
The Cake Layers: Chocolate, Because Duh
I went with a moist chocolate cake that holds shape. You can do vanilla, but chocolate hides trimming sins like a champ. I baked:
- One 9-inch round for the face
- Two 6-inch rounds for the ears
I lined pans with parchment and used baking spray like my life depended on it. I cooled the cakes in the pans for 15 minutes, then turned them out onto racks. Once cool, I wrapped them tightly and chilled them overnight.
Pro tip for neat layers
Level your cakes with a serrated knife. I saved the scraps for “chef’s tasting”—aka snacking while I worked. IMO, mandatory.
The Buttercream: Smooth, Sturdy, Not Too Sweet
I used American buttercream because it pipes like a dream and holds shape. Fancy Swiss meringue? Love it, but not today. I made a big batch and divided it into:
- White for eyes, face highlights, and base
- Black (tinted with gel color and a little cocoa powder)
- Red for the tongue and possibly a background border
- Flesh tone for Mickey’s face (tiny drop of pink + tiny drop of brown)
Coloring without heartbreak
Gel color = strong, vibrant, and it won’t thin your frosting. For true black, start with dark cocoa, then add black gel. Let it sit 30 minutes—colors deepen over time. FYI, patience tastes better than gray “black.”
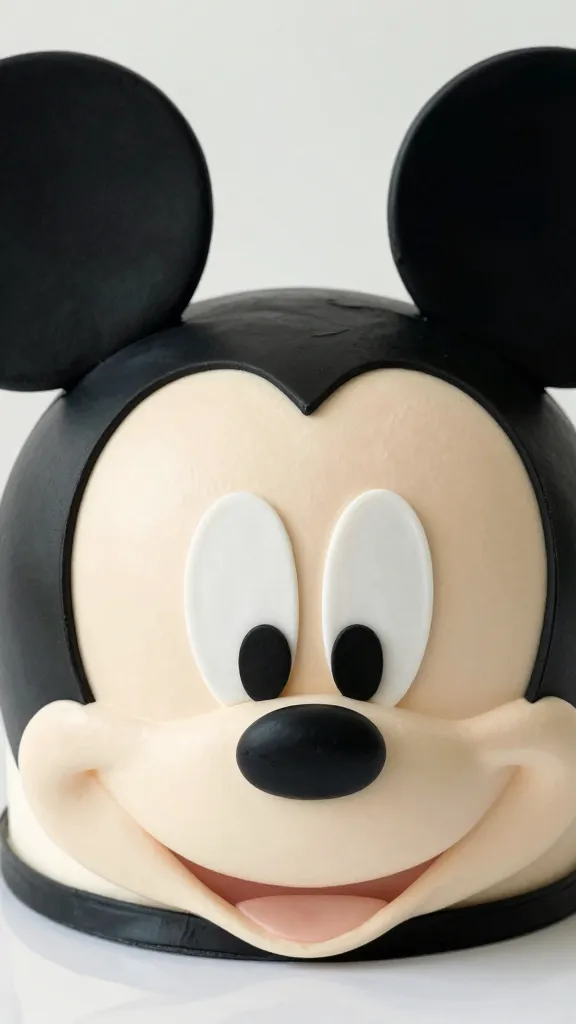
Shaping the Face: Geometry With Frosting
Assembly time. I placed the 9-inch round in the center of a large board. Then I set the two 6-inch cakes as ears at the top left and right, slightly tucked under the head so it looked natural.
Stabilizer moves:
- Smear a little buttercream under each cake so it doesn’t slide.
- Use bubble tea straws (or short dowels) under each ear if your cake feels heavy.
I trimmed the bottom of the face cake just a smidge to flatten the jawline. Mickey’s not super round—he’s got a subtle chin curve.
Crumb coat = your best friend
I did a thin layer of frosting over everything and chilled it for 25 minutes. Crumb coat locks down crumbs and creates a base for smooth finishing. Skip it and you’ll chase crumbs like confetti in a windstorm.
The Face Details: Where It Gets Real
I printed a simple Mickey face reference and worked from that. I lightly traced eye, nose, and mouth guides on the chilled cake using a toothpick. No freehand heroics required.
Order of operations (trust me, it matters):
- Frost the face area with the flesh tone. Smooth with a bench scraper or offset spatula.
- Fill the black areas: ears, top of the head, and outside border. Keep edges clean.
- Pipe white ovals for eyes. Use a small round tip or cut a small hole in a piping bag.
- Add the pupils in black. Tiny highlight dot in white? Chef’s kiss.
- Pipe the nose in black with a flattened dome shape. I smoothed it with a warm spoon.
- Outline the mouth with black and fill the inside with red, leaving a small white gap for teeth.
Clean edges without tears
I used a small paintbrush (food-safe) dipped lightly in water to clean up tiny smudges. For sharper lines, chill the cake 10 minutes, then go in with a steady hand. Cold frosting behaves. Warm frosting runs off to join the circus.
Texture vs. Smooth: Choose Your Fighter

I went mostly smooth for classic Mickey, but I textured the black areas with a star tip to hide any uneven color. This also made the ears look plush, which felt right.
If you want smooth everything:
- Use a hot offset spatula—dip in warm water, wipe, glide.
- Chill between passes to avoid tearing.
If you want texture:
- Star tip for ears and borders
- Small round tip for facial outlines and details
- Petal tip for tongue curve if you’re feeling extra
Disaster Management: Things I Fixed on the Fly
I messed up the eye placement at first. One looked like it wandered off to find snacks. I scraped it off with a cold knife, chilled the spot, and tried again. Crisis averted.
My black frosting also tried to stain the flesh tone. I added a tiny buttercream “barrier line” between colors and smoothed it down. Invisible guardrail = no smudges. IMO, worth the extra minute.
When the cake sweats
I pulled the cake from the fridge on a humid day, and it got tacky. I blasted a fan for five minutes, and the condensation chilled out. Don’t touch the frosting when it sweats—let it dry, then fix.
Finishing Touches: Border, Sparkle, and Transport
I piped a simple red bead border around the base to tie things together. I added a tiny white highlight on the nose and pupils for that cartoony pop. Simple, clean, iconic.
Transport happened on a non-slip mat in the trunk, AC blasting, cake chilled solid. I brought extra frosting and a spare tip for emergency touch-ups. Did I need them? No. Did that make me feel powerful? Absolutely.
What I’d Do Differently Next Time
I’d cut a template for the eyes and mouth to nail symmetry faster. I’d also use a slightly lighter flesh tone; mine looked perfect inside but darker in photos. And I might try a chocolate ganache layer under the buttercream for extra smoothness and stability. Extra? Yes. Worth it? Probably.
FAQ
Do I need special pans for the ears?
Nope. I used two 6-inch rounds, but you can bake a sheet cake and cut circles with a bowl or ring cutter. Just freeze the cake for 20 minutes first so it cuts cleanly.
How do I make true black frosting without a weird taste?
Start with chocolate buttercream, then add black gel color. Let it rest for 30–60 minutes to deepen. If it tastes bitter, a tiny pinch of salt and a drop of vanilla balances it out.
Can I use fondant instead of buttercream?
Totally. Cover the cake with fondant and cut the facial features from colored fondant. Use a tiny bit of water or edible glue to attach. It’ll look super clean—just keep it covered so it doesn’t dry out before serving.
How far in advance can I make this?
Bake the cakes 2 days ahead, wrap, and chill. Frost the day before serving, then refrigerate. Pull it out 45–60 minutes before serving so the buttercream softens. FYI, cold buttercream tastes meh.
My lines look shaky—how do I fix them?
Chill the cake. Pipe slowly with a small round tip and keep the bag slightly off the surface, not dragging. If you mess up, lift, chill that spot, and re-pipe. Warm hands equal wobbly lines, so take breaks.
What if I don’t have piping tips?
Use zip-top bags and snip tiny corners. For smoother fills, spread with a small offset spatula. For outlines, keep cuts extra small. It’s DIY, but it works.
Conclusion
I went from “I hope this looks like Mickey” to “Whoa, that’s Mickey” with a solid plan, a lot of chilling, and some strategic fixes. You can absolutely do this, even without bakery-level skills. Keep it simple, trust the process, and remember: cake forgives. And if it doesn’t? Frosting covers everything.