You want an Elmo cake that makes kids squeal and parents ask for your secret? Let’s do it. We’re baking a cheerful Elmo on the outside with a rainbow cake surprise inside, and yes, it’s easier than it looks. No fondant gymnastics required, no culinary school diploma necessary. Just a plan, a few smart tools, and a little color magic.
Why an Elmo Cake with a Rainbow Center Wins Every Party
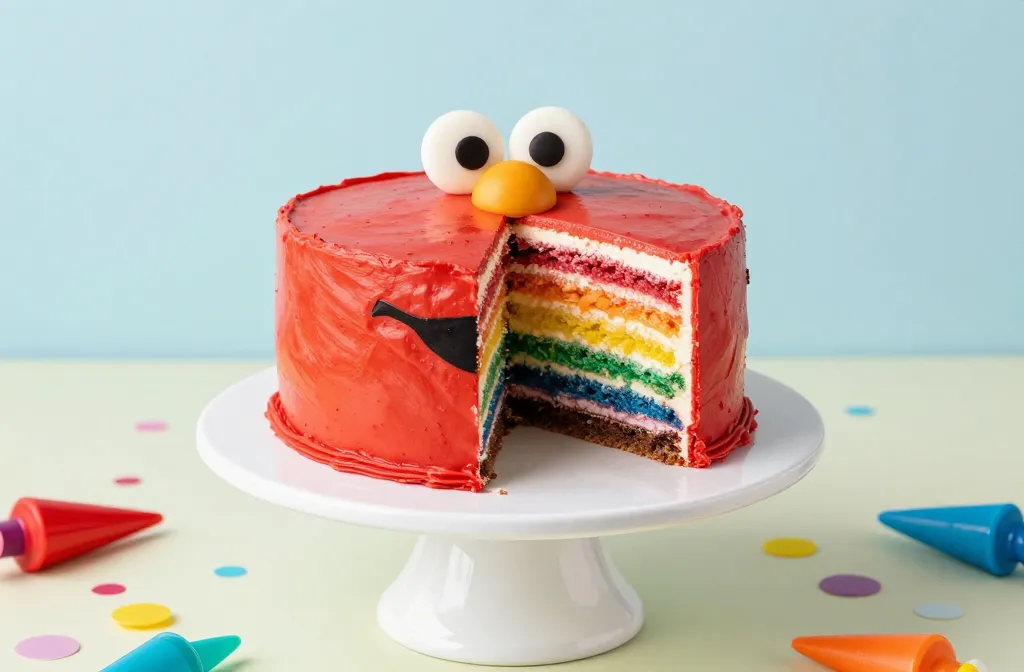
You get double the delight: the instant recognition of Elmo’s adorable face and the “whoa!” factor when you slice into rainbow layers. Kids go quiet (for five seconds) and stare. Parents snap photos like paparazzi. And honestly, you feel like a baking wizard.
Big picture: We’ll bake colorful layers, stack them, frost with red buttercream “fur,” and add simple facial features. If you can frost a cupcake and cut circles from fondant or marshmallow, you can nail this.
What You’ll Need (Without Emptying Your Wallet)
For the rainbow cake layers:
- 2 batches of your favorite vanilla cake batter (homemade or a good box mix)
- Gel food coloring: red, orange, yellow, green, blue, purple
- Six 8-inch round cake pans (or bake in batches and chill between rounds)
- Parchment circles and nonstick spray
For the frosting and décor:
- 2–3 batches vanilla American buttercream (sturdy and pipe-able)
- Red gel color for Elmo’s fur
- Black gel color for the mouth details (or pre-made black fondant)
- White fondant (for eyes) and a small piece of orange fondant (for the nose)
- Round cutters: 2-inch and 1.5-inch for eyes; optional oval cutter for the nose
- Piping bags and tips: open star tip (e.g., Wilton 1M or 4B) or grass tip for fur, small round tip for details
- Offset spatula, bench scraper, turntable (IMO, the turntable is a game-changer)
Pro gear extras (nice-to-have):
- Simple syrup in a squeeze bottle (keeps layers moist)
- Dowel or bubble tea straws for extra stability if traveling
The Game Plan: Bake, Color, Stack, Wow
We’ll go from batter to Elmo without chaos. Promise.
Step 1: Mix and Color Your Batter
Divide your vanilla batter evenly into six bowls. Tint each one a bright rainbow shade. Use gel colors for punchy hues without thinning the batter. If the colors look bold in the bowl, they’ll look great baked.
Tip: For even layers, weigh the batter in each pan. Aim for 10–12 oz per 8-inch pan depending on your recipe.
Step 2: Bake and Chill
Bake the layers at 325–350°F until a toothpick comes out clean. Cool in pans 10 minutes, then turn out onto racks. Wrap each layer in plastic and chill. Slightly cold layers crack less and stack straighter. FYI, chilling is the underrated hero of layer cakes.
Step 3: Make Your Buttercream
Whip up a big batch of American buttercream. Keep about 1/3 plain for crumb coat and filling. Tint the rest a vibrant Elmo red. Go slow with red gel—add, mix, wait a minute, then add more. The color deepens as it sits.
Color hack: Stir in a tiny touch of cocoa powder to knock out pink undertones before adding red gel. It warms the base color so you get true Elmo red faster.
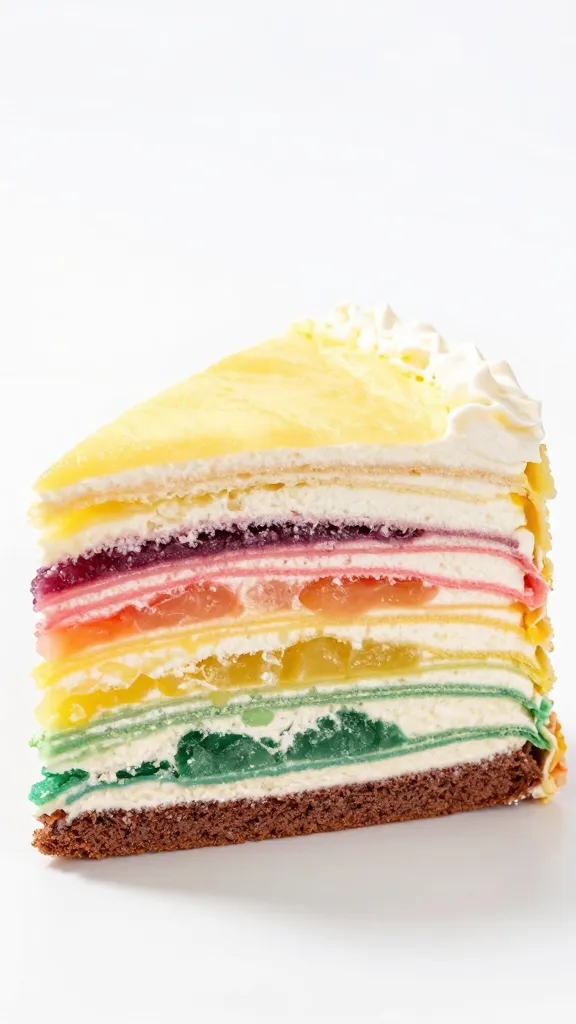
Stacking the Rainbow (Clean, Not Crooked)
This is your reveal moment waiting to happen, so stack with care.
- Level any domed tops with a serrated knife.
- Set purple on your board first, then blue, green, yellow, orange, and red on top for classic top-to-bottom rainbow.
- Brush each layer lightly with simple syrup (optional but clutch for moisture).
- Spread a thin, even layer of plain buttercream between each cake layer. Don’t go too thick or it’ll slide.
- Insert one or two bubble tea straws if the cake feels wobbly. Trim flush.
Crumb coat: Swipe on a thin coat of plain buttercream over the whole cake. Chill 20–30 minutes. This locks in crumbs so your red fur stays pristine.
Elmo’s Face Without Fondant Overload
We’ll do most of the texture with piped buttercream and use fondant only where it makes sense.
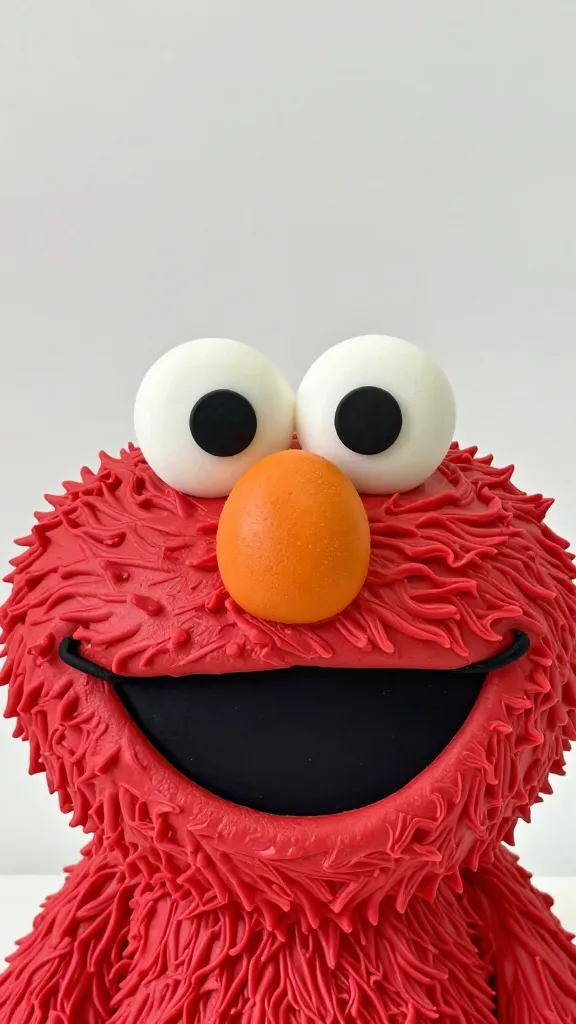
Fur Texture That Looks Complicated (But Isn’t)
Use your red buttercream with a star or grass tip. Pipe short, quick pulls all over the cake, starting from the bottom and working up. Keep the pulls random so it looks fluffy. If your hand cramps, you’re doing great—take a break and brag.
Tip: If you prefer a smooth base, add a thin red coat before texture, then pipe fur over it. That way no white peeks through.
Eyes, Nose, Mouth: The Friendly Elmo Look
– Eyes: Roll out white fondant and punch two circles. Add smaller black circles or edible black paint for pupils. Angle them slightly inward for that curious Elmo vibe.
– Nose: Shape orange fondant into an oval. Slightly flatten it so it doesn’t roll off.
– Mouth: Cut a wide smile from black fondant, or pipe a black buttercream smile with a round tip and smooth it with a warm spatula.
Placement order:
- Lightly mark eye positions with toothpicks before piping heavy fur nearby.
- Attach eyes with a dab of buttercream. Add pupils slightly off-center (cute, not creepy).
- Press on the orange nose below and centered between the eyes.
- Add the smile last so you can adjust around the fur texture.
IMO: Keep Elmo’s features big and bold. Tiny eyes or a tiny nose make him look off-brand fast.
Make the Rainbow Cut Moment Epic
Want the slice to look as dramatic as possible? Here’s how to stage it.
– Chill the finished cake 30–45 minutes so the layers set but don’t harden.
– Heat your knife under hot water, wipe dry, then slice straight down in one motion.
– Wipe the knife between slices. Yes, it’s fussy. Yes, it makes Instagram-level slices.
– Face the first slice to the crowd. Accept compliments. Pretend you’re surprised too.
Flavor Upgrades (Because We’re Extra)
– Add lemon zest to the yellow layer, a touch of almond to the purple, or vanilla bean to all.
– Brush each layer with a flavored simple syrup (think orange, raspberry, or coconut).
– Fill between layers with thin jam swirls for a rainbow sherbet vibe.
Just don’t: Overfill. Slippery fillings = leaning tower of Elmo.
Timing, Storage, and Sanity
– Bake the layers 1–2 days ahead. Wrap and refrigerate, or freeze up to a month.
– Frost the day before the party. Chill overnight, then bring to room temp 45–60 minutes before serving.
– Transport in a snug cake box with a nonslip mat. If it’s hot out, run the AC like you mean it.
FYI: Red frosting deepens over time. Mix it a shade lighter than your goal; it’ll hit perfect Elmo red by morning.
FAQ
How do I get truly vibrant rainbow layers without weird flavors?
Use gel food coloring, not liquid. Gel keeps the batter thick and vibrant. Add color gradually and stir well. If you taste bitterness, you added too much—back off and let the color develop as it bakes.
Can I make this gluten-free or dairy-free?
Yes. Use a reliable 1:1 gluten-free flour blend and check your baking powder brand. Swap butter for dairy-free sticks and milk for a neutral plant milk. Chilling becomes extra important with allergy-friendly cakes, so give it time to set before stacking.
Do I need fondant for the face?
Not strictly. You can pipe everything with buttercream: white circles for eyes, black dots for pupils, and a big orange oval for the nose. Fondant just gives cleaner shapes and stays put on warm days.
My red buttercream looks pink. Help?
Start with a tiny bit of cocoa powder to mute the white base, then add red gel slowly. Let the color sit 10–15 minutes before adding more. If you still see pink, add a drop of orange gel to warm it up. It’ll deepen overnight—be patient.
How do I keep the cake from leaning?
Level the layers, use thin, even filling, and chill between steps. If it still wobbles, insert two bubble tea straws near the center for support. Use a turntable to check from every angle while you stack.
What if I only have two pans?
Bake in batches. Mix all the batter at once, divide and color it, then bake two layers at a time. Keep the unbaked colored batters covered at room temp. Rotate pans halfway for even baking.
Wrap-Up: Big Smiles, Bigger Slices
You built a party showstopper: Elmo’s cheerful face outside, rainbow magic inside. The steps sound extra, but you tackled them one by one—bake, chill, stack, fluff, face, boom. IMO, the best part is that first slice reveal when the room collectively gasps. The second best part? Leftovers for breakfast. Don’t @ me.