If your makeup brushes look like they’ve survived a glitter tornado and a foundation mudslide, we need to talk. Dirty brushes mess with your blend, wreck your skin, and waste your products. The good news? You can fix all of that with a little soap, some warm water, and five minutes of effort. Let’s clean those bristles and get your glow back.
Why Clean Brushes Even Matter (Yes, It’s a Big Deal)
Dirty brushes don’t just look gross—they spread oil, bacteria, and old pigment. That combo equals breakouts, patchy coverage, and colors you never asked for. You wanted peach blush, not last week’s bronzer cameo.
Clean brushes mean:
- Better application: smoother blending, true color payoff, less streaking.
- Happier skin: fewer clogged pores and surprise zits.
- Longer brush life: clean bristles don’t fray or shed as fast.
FYI, if your makeup starts looking “meh” for no reason, your brushes probably need a bath.
What You Need (No Fancy Gadgets Required)
You don’t need a lab. Just grab:
- Gentle cleanser: baby shampoo, fragrance-free face wash, or a brush-specific soap.
- Dish soap (for deep grime): a tiny drop cuts oils from foundation/cream products.
- Lukewarm water: hot water can loosen the glue in the ferrule and cause shedding.
- Clean towel: for drying and reshaping.
- Textured mat or your palm: for a little scrubbing action.
- Optional: 70% isopropyl alcohol for quick spritz disinfecting of synthetic brushes.
Quick Product Picks (IMO)
- For natural hair: a gentle shampoo or brush soap.
- For synthetic: dish soap + a drop of olive oil for stubborn cream residue, then rinse like crazy.
- Skip harsh sulfates and heavy fragrance—your skin will thank you.
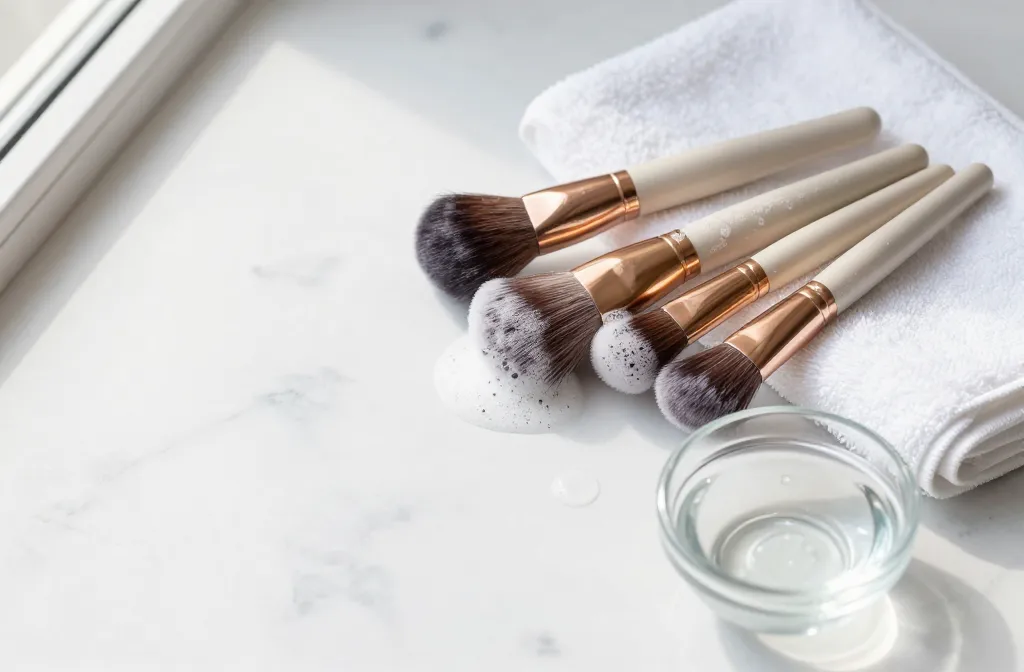
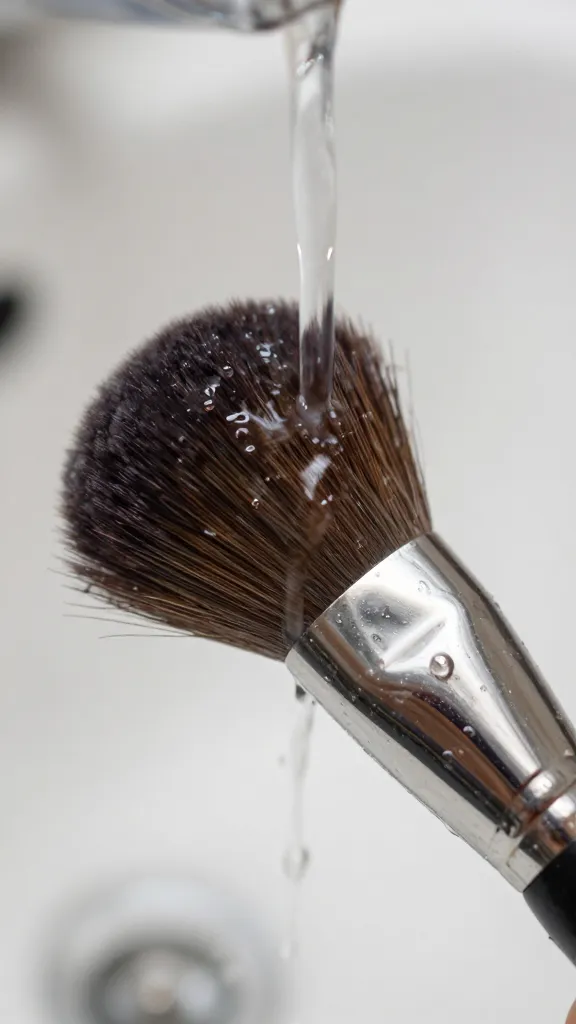
The Simple Step-by-Step Routine
Let’s make this foolproof. Do this weekly for face brushes and every 1-2 weeks for eye brushes.
- Wet just the bristles: Hold the brush bristles-down under lukewarm water. Keep the ferrule (the metal part) and handle dry to protect the glue.
- Add cleanser: Put a pea-size drop of soap in your palm or on a mat.
- Swirl gently: Work up a lather. Don’t smash the bristles—treat them like a tiny expensive pet.
- Rinse thoroughly: Keep rinsing until water runs clear. Still cloudy? Repeat the soap step.
- Squeeze and shape: Gently press out excess water with a towel and reshape the bristles.
- Dry like a pro: Lay brushes flat on a towel with bristles hanging slightly off the edge of a counter for air flow. Never dry upright—water drips into the ferrule and loosens glue.
Deep-Cleaning Power Move
For heavy foundation or cream contour brushes, mix dish soap with a tiny drop of olive oil. Soap cuts product; oil releases waxes. Then follow with a second wash using regular gentle soap to remove any oil residue.
Natural vs. Synthetic Bristles: Handle With Care
Not all brushes want the same spa day.
- Natural hair (goat, sable, etc.): Treat them like your own hair. Use gentle shampoo and cool water. Condition occasionally with a drop of fragrance-free hair conditioner, then rinse well. They excel with powders.
- Synthetic (nylon, taklon): More durable, great for creams and liquids. Dish soap works wonders for oily buildup. They handle alcohol spritzing better for quick disinfecting.
Spot-Clean vs. Full Wash
– Spot-clean: Between looks or shades, use a brush cleaner or a tiny bit of micellar water on a paper towel. Swipe until color lifts. This won’t remove oil/bacteria fully, but it keeps colors from mixing.
– Full wash: Needed weekly (face) or biweekly (eyes) to remove oil, dead skin, and germs. Non-negotiable if you value your skin.
How Often Should You Actually Clean?
Let’s keep it real: daily is unrealistic for most of us. Try this:
- Foundation/concealer/cream brushes: 1-2 times per week. They hold oils and bacteria fast.
- Powder/bronzer/blush: Once a week.
- Eyeshadow/liner: Every 3-7 days, more often if you switch colors a lot or have sensitive eyes.
- Beauty sponges: After each use if possible; at least every 2-3 uses. Replace every 1-3 months.
FYI: If you struggle with acne, tighten those timelines a bit. Your skin will notice.
Drying and Reshaping Without Ruining Anything
Drying makes or breaks your brush’s lifespan.
- Never dry upright: Water seeps into the ferrule and weakens glue, then hello shedding.
- Lay flat, bristles over the edge: Air circulates and the head keeps its shape.
- Use brush guards: Slip on a mesh guard while drying to keep tapered shapes sharp.
- Avoid hair dryers and heaters: Heat warps bristles and can melt glue. Patience pays.
Rescue Mission for Misshapen Brushes
If a brush flares out, re-wet, add a dab of conditioner, comb through gently with a clean lash comb, rinse, then dry in a guard. Not perfect, but it helps.
Common Mistakes You Can Skip
Let’s save you from rookie errors:
- Soaking the whole brush: Tempting, but you’ll waterlog the handle and kill the glue.
- Using super hot water: It can loosen adhesive and rough up bristles.
- Too much soap: Residue = stiff, crunchy bristles. Rinse until it squeaks clean.
- Scrubbing like you’re washing dishes: Gentle circles only. No smashing.
- Skipping washes “because I only used powder”: Oil and dead skin still build up. Sorry.
Make It a Habit Without Hating It
If cleaning feels like a chore, tie it to something you already do.
- Sunday reset: Wash brushes, change sheets, delete 47 screenshots you’ll never use. Boom, routine.
- Keep a mini soap by the sink: Visual reminder helps.
- Do a quick spot-clean midweek: Less grime for your weekly wash to tackle.
- Own fewer brushes, rotate smart: Quality over quantity, IMO.
FAQ
Can I use regular shampoo or hand soap?
Yes to gentle, fragrance-free shampoo. Hand soap can work in a pinch, but many formulas strip too much and dry out bristles, especially natural hair. If you use hand soap, moisturize natural bristles afterward with a tiny bit of conditioner, then rinse thoroughly.
How do I clean a beauty sponge properly?
Wet it fully, add a blob of gentle soap, and squeeze repeatedly under lukewarm water until clear. For a deep clean, microwave a cup of soapy water with the sponge submerged for 60 seconds, then let it cool before squeezing out—this helps sanitize. Replace sponges every 1-3 months, sooner if they tear or smell funky.
My brush still looks stained. Is it dirty?
Some pigments stain bristles, especially white or natural ones. If it rinses clear and doesn’t feel greasy, it’s clean—just stained. Try a second pass with dish soap for creams, or a dedicated brush cleanser for stubborn dyes.
Do I really need a brush cleaning mat?
Nope. Your palm works fine. A textured mat speeds things up and feels a bit extra, which is fun, but it’s not required. Spend on good brushes first, gadgets later.
Is alcohol safe for all brushes?
Stick to light alcohol spritzes on synthetic brushes only. Alcohol dries out natural hair and can make it brittle. If you need to disinfect natural bristles, wash thoroughly with soap and water and let them dry completely.
How do I stop shedding?
Shedding happens when glue weakens or bristles break. Keep water away from the ferrule, avoid hot water and harsh scrubbing, and dry flat. If a brush sheds from day one, it’s a quality issue—exchange it if you can.
Conclusion
Clean brushes give you better makeup, clearer skin, and tools that actually last. The routine takes minutes, costs almost nothing, and saves you from streaky foundation and random breakouts. Set a weekly date with soap and warm water, and your future face (and photos) will thank you. Now go clean that foundation brush—it knows what it did.